
Repairing cisco console ports

Consolidation effort: Repost of short page I have done back in 2003:
This describes how to repair the broken serial console ports on some Cisco routers, such as: 2500, 2600, 7200, 7500 series.
Important disclaimer: While unlikely, it could still be possible to damage your router completely by following the steps described in this page, we take no responsibility for any damage which could be possibly caused. If you feel insecure about soldering on electronic equipment, ask someone who is skilled in that to do it for you. You should also certany not perform this steps if you have a support contract with cisco since this will void your warranty.
Foreword
Our network lab consists our of 13 different devices, mainly Cisco and is used by us to simulate different network environments for our projects. Until now, when we needed the console on some devices, we just plugged the notebook or workstation's serial cable into that device. It worked well for quite some time.
Problem
The 28th of November 2003 was quite unlucky day for our lab. Within just under 2 hours console ports on 6 of our devices malfunction, to be exact we have lost console ports on:
2501 2503 2 x C7200-IO cards 2 x C7200-FE-IO cards
The malfunctions in 5 devices manifested in ability to see the output, but not type in and one console died completely.
In addition to that, one USB to Serial adapter begun to malfunction as well.
Cause
We still do not exactly know what caused this problem, we used this setup for quite a while without any problems, but we are pretty sure that our "plug-unplug console cable" game made this thing possible in the first place. Lessons learned: Use console server as much as possible, avoid plugging and unplugging serial console cables while equipment is on.
Fix
First, our searches on the net resulted in nothing, we have seen that many people had this problem before, but all of the answers where basically "RMA or buy new" advises.
Well, our machines are not under support contract, so we cannot RMA for free and repair by Cisco would have cost us more than the whole new machines off eBay. Still, even going trough eBay we where looking at 1+k USD. So we decided to try and repair the broken machines, which turned out to be really easy and we where quite surprised that no one mentioned this option yet.
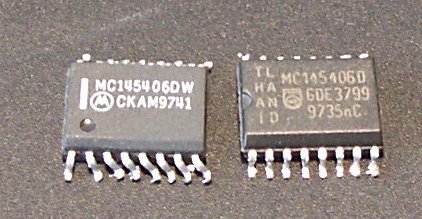
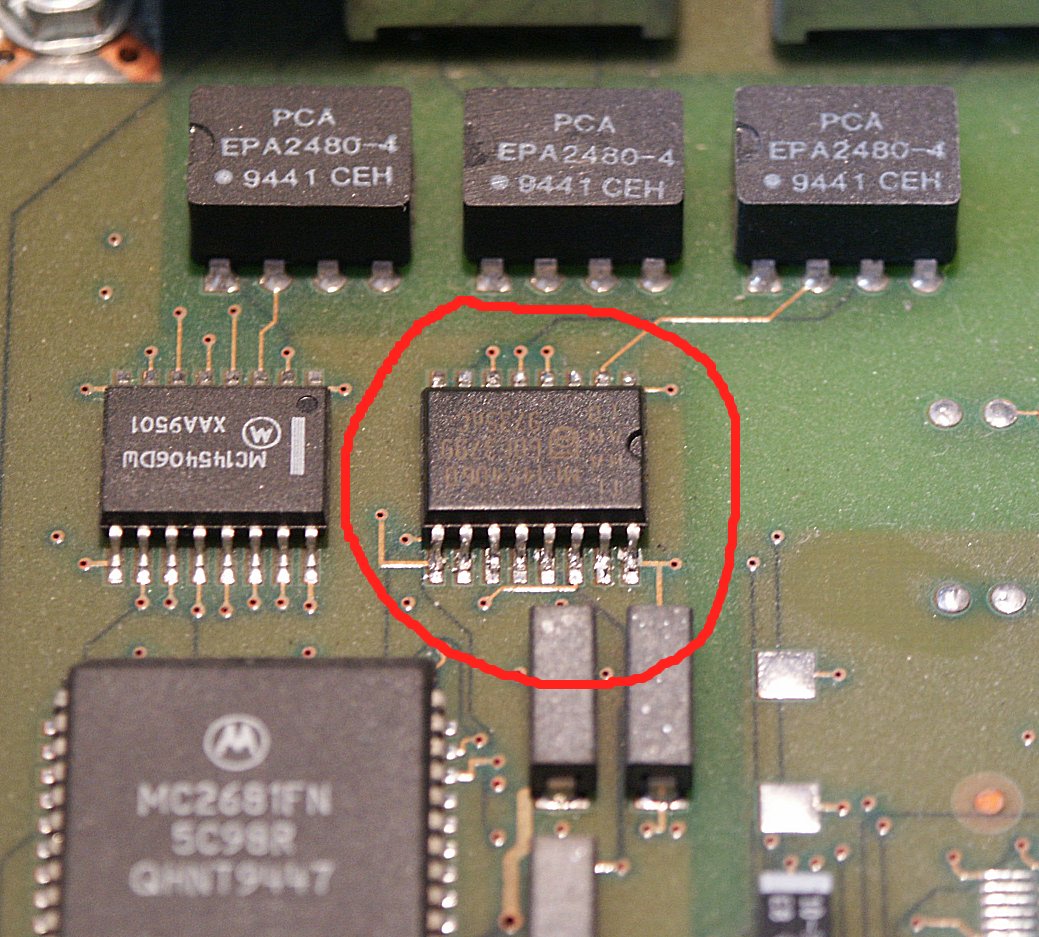
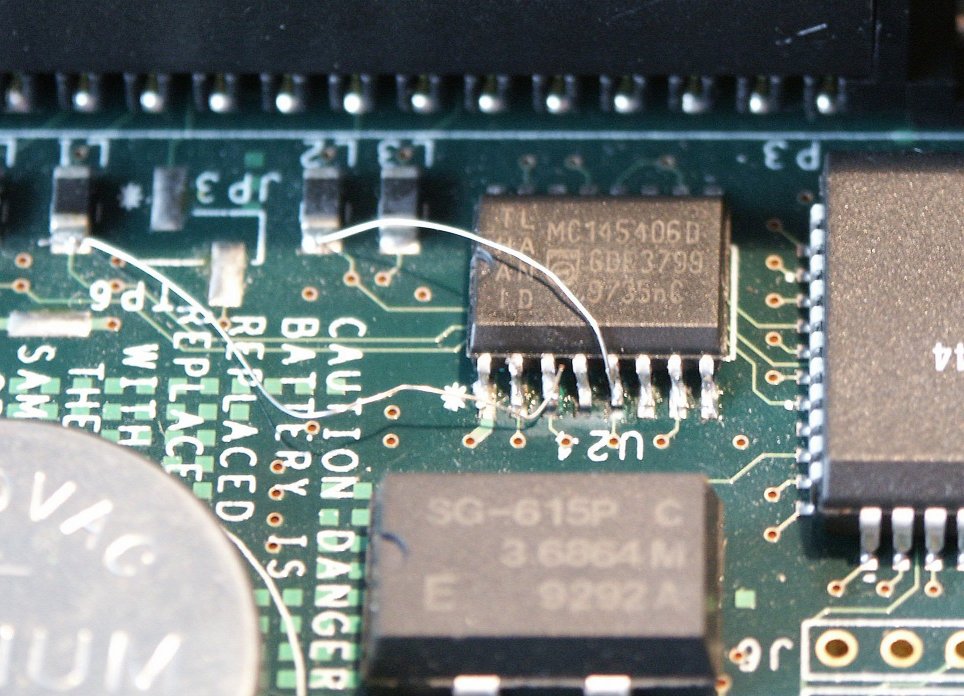
The base of the problem is the broken serial console driver chip which is soldered on the motherboard of router / card, in all of our broken devices this chip was identified as ether Motorola MC145406DW or Philips MC145406D which are basically the same chip and one can be substituted by another. Replacing the chip is quite easy, even a person with little soldering skills can do that.
Replacement chips
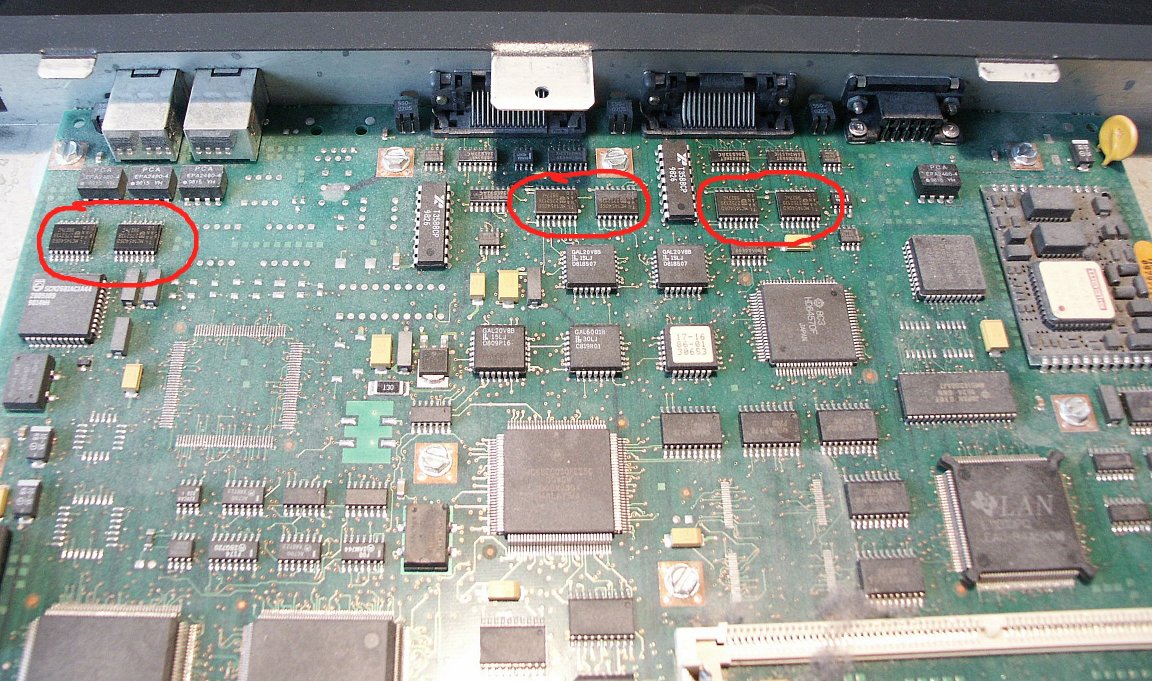
First thing you need is are the replacement chip(s), you can ether buy them if you find a source, or you can find a donor router and get the chips from there, which was our choice. What we found out is that all 2500, 2600, 7200 (I/O Boards) and 7500 (RSP Boards) routers use those chips to drive the console and aux ports, we also think, that most probably 3600 series does as well.
In addition to that we discovered, that all "communication" serial ports with DB60 connector are equipped with TWO of those chips per port. So, wic-1t has 2 of such chips (But not WIC-2T, they use other chips), PA-4T: 8, 7500 Fast Serial IP: 16 and 2501,2502,2503,2504 routers 6 (4 for serial ports and 2 for aux and console). And last but not the least: you could sacrifice some of the router functionality like aux or serial ports and use their chips to repair console.
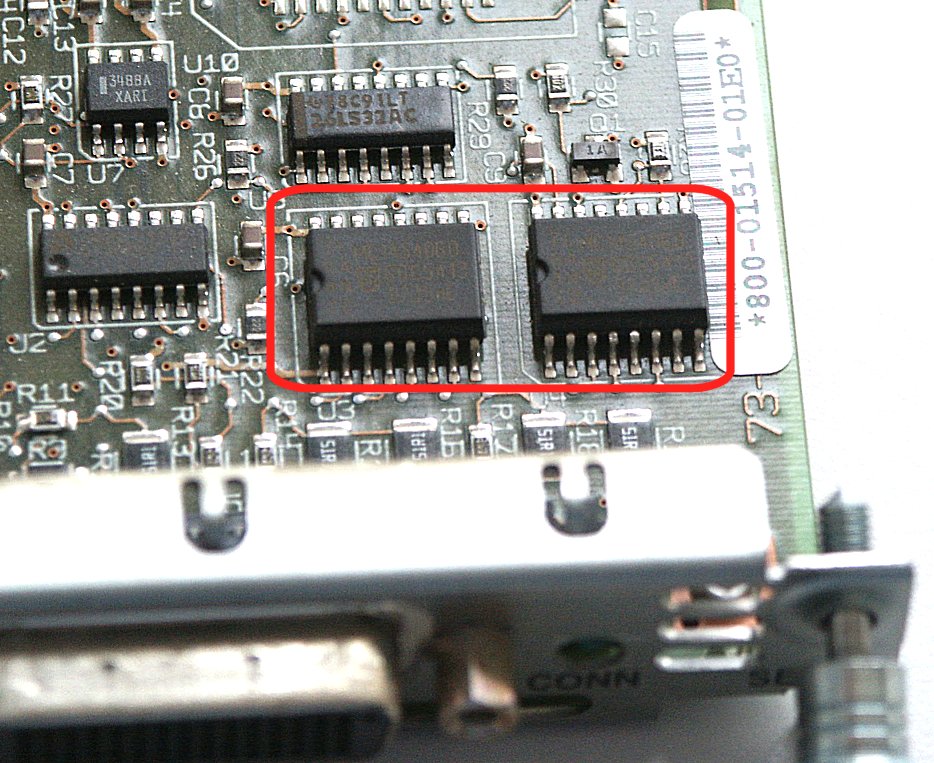
[01.12.2003 Update]: If you want to have lots of chips for little money, my defenate advise would be to get a CX FSIP8 Fast Serial Interface for 7500 routers from ebay, those sell for ~30$ and have 16 chips onboard.
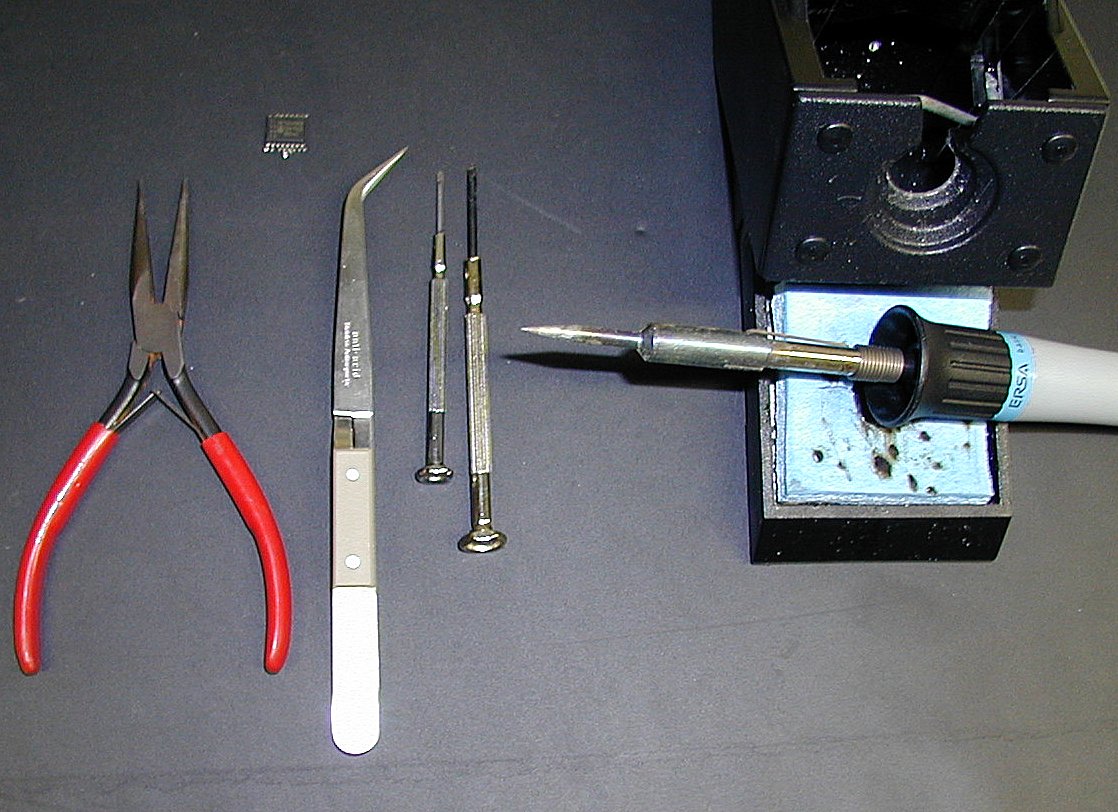
Tools / Skills
What you will need to perform the transplantation:
- Fine tipped soldering iron
- Tweezers
- Miniature screwdriver
- Small Pliers
- Finesse in a hand and patience
Removing the donor chips (Skip this if you already have chips at hand)
The basic rules are:
- Think about ESD protection
- Do not overheat the chip
- Do not break off the chip's legs
There are many ways to remove chip, the most advanced ones where you heat up each leg and suck out / absorb the fluid tin, but it will require you to use soldering paste or tin when you resolder the chip. The plain and simple way to remove the chips is: Stick miniature screwdriver between the legs of the chip, heat up the leg just enough for the solder to become fluid and gently bend the leg on the side / up (Not too far, about as much as visible on the left chip in the first image). After you finish with all legs you should try to remove chip, if it is still stuck try to find out which legs are still soldered on and repeat the "heat up, bend" procedure.
After 1-2 chips you should be able to safely remove them within ~2 minutes per chip. After the chip is removed use Pliers / Tweezers to realign the legs into their normal position. Make sure they are in correct positions from horizontal and vertical axes.
Removing broken chips
The basic rules are:
- Think about ESD protection
- To not damage the mainboard
- Remove the correct chip
- Remember the chip alignment
First of all you need to know which chip to remove, you can find the correct one by ether following mainboard leads from the console port resistors or just taking the chip nearest to the console port.
Again, you can ether use advanced methods of removing the fluid tin by sucking out or absorbing it, or you can simply bend the chips's legs when they heat up well enough. Whatever you do, make sure that you do not damage the mainboard, do not use force to remove the chip or you might end up with damage on mainboard's leads, if you still do damage the board, do not panic, you can fix it by tracing where those leads went and replace them by thin wires (See images in next section).
[01.12.2003 Update]: Lars-Åke Domesjö send me a hint for another way to remove the chips:
Another way to loosen the chip is to put a lot of tin across all the legs of the chip, a "tinbridge", first one side and then the other of the chip then quickly back to the first side and genltly push the chip sideways with the soldering iron tip. I find this way more kind to the pc-board, safer and less damage is done. And it's quick aswell, try it ;-)

Installing working chips
The basic rules are:
- Think about ESD protection
- Do not overheat the chip
- Seat the chip correctly
First of all, make sure you seat the new chip in correct direction, same way the previous was seated. if you do forget how it was aligned, you can pretty safely align it in the same way as aux chip is, on all our devices they faced the same direction.
It would not hurt to add some very small amounts of tin to the leads on mainboard prior of seating the chip in place, just to make sure the contacts are really good.
Use tweezers to position the chip, then, while still holding the chip in its place with tweezers push gently each leg down with soldering iron, the tin on the mainboard and chip legs should connect flawlessly.
Testing
Now plug in the console cable and turn on the router, you should have working console. If you don't check following:
- That all legs of the chip are connected to the mainboard (Push them down to motherboard once more with hot soldering iron)
- That you replaced the correct chip (Not aux one)
- That your new chip is aligned correctly
Just for statistics: We successfully repaired all 6 devices, the only mistakes done where replacing wrong (aux) chip in 2503 and destroying some mainboard leads on C7200-I/O card, which we repaired by bridging with wires.
580 Comments
C
rcarwalwelregro... (not verified)
onMon, 03/28/2022 - 22:09
Permalink
C
On this platform, you can find a wide selection of casino slots
casino games (not verified)
onFri, 05/16/2025 - 21:35
Permalink
Here, you can discover a wide selection of slot machines from top providers.
Users can enjoy traditional machines as well as feature-packed games with stunning graphics and bonus rounds.
Whether you’re a beginner or a casino enthusiast, there’s something for everyone.
<a href="https://futurefly-whitetiger.com">no depisit bonus</a>
The games are available 24/7 and designed for desktop computers and smartphones alike.
You don’t need to install anything, so you can get started without hassle.
Platform layout is user-friendly, making it convenient to explore new games.
Join the fun, and dive into the thrill of casino games!
iGaming play
RouletteRogue (not verified)
onWed, 12/03/2025 - 05:57
Permalink
https://t.me/s/iGaming_live/4866
Bilinçli casino oynamak , deneyiminizi güvenceye alır .
Ernesthip (not verified)
onThu, 08/14/2025 - 07:14
Permalink
Sorumlulukla kumar oynamak , keyfinizi korur .
Oyun bütçenizi önceden belirlemek , sorunları önlemeye katkı sağlar .
Katılımınızı yönetim araçlarını kullanmak, sorunları engellemenize destek olur .
<a href="https://casinoalevtr.com/">Alev Online Casino</a>
Kumarın sorunlarının farkında olmak, uzun süreli keyif sağlar .
İhtiyaç halinde danışmanlık hizmeti danışmak, keyfi artırmaya yardımcı olur.
Bu adımlar , sorunsuz keyifli kumar deneyimi deneyimi zenginleştirir .
Delivers its users with guidance and solutions
ClaudiaGeR (not verified)
onThu, 04/09/2026 - 15:06
Permalink
https://telegra.ph/SpinoGambino-casino-voor-Belgische-spelers-ervaren-in... - pino
https://telegra.ph/SpinoGambino-casino-voor-Belgische-spelers-ervaren-in...
http://sewon1981.com/bbs/board.php?bo_table=sub51&wr_id=110702 Provides its users http://0612720000.com/bbs/board.php?bo_table=sub5_1&wr_id=45211 Delivers users with http://smkinter.com/bbs/board.php?bo_table=recruit&wr_id=526802 Provides people wit http://kbbio.kr/bbs/board.php?bo_table=qna&wr_id=284498 Offers people with http://dmonster592.dmonster.kr/bbs/board.php?bo_table=qna&wr_id=1315960 Offers people with 3e31_88
https://telegra.ph/SpinoGambino-casino-voor-Belgische-spelers-ervaren-in... - pino play
https://telegra.ph/SpinoGambino-casino-voor-Belgische-spelers-ervaren-in...
http://acesonic.co.kr/bbs/board.php?bo_table=online_inquiry&wr_id=224380 Delivers people wit http://dmonster592.dmonster.kr/bbs/board.php?bo_table=qna&wr_id=1315960 Offers people with http://kgtop.kr/bbs/board.php?bo_table=qa&wr_id=185063 Provides its users http://doowontcs.com/bbs/board.php?bo_table=board&wr_id=406674 Offers people with http://signsilla.com/bbs/board.php?bo_table=0401&wr_id=1437008 Delivers people wit
Provides people with guidance and responses
ClaudiaGeR (not verified)
onMon, 04/20/2026 - 18:01
Permalink
<a href=https://telegra.ph/Field-Intelligence-Access-Breaking-Global-Updates-wit... play online</a>
https://telegra.ph/Field-Intelligence-Access-Breaking-Global-Updates-wit...
http://av3526.com/forum.php?mod=viewthread&tid=110&pid=388427&page=1084&... Offers users with help and solutions http://mm520888.com/forum.php?mod=viewthread&tid=118&pid=1476531&page=37... Provides users with guidance and solutions http://dongmi.webmaker21.kr/bbs/board.php?bo_table=qna&wr_id=113619 Provides users with http://mm520888.com/forum.php?mod=viewthread&tid=118&pid=1476538&page=37... Delivers people with support and answers https://gtamilchat.info/forum/index.php?topic=4812.new#new Provides users with guidance and responses 1cc6b89
<a href=https://telegra.ph/Field-Intelligence-Access-Breaking-Global-Updates-wit... pino</a>
https://telegra.ph/Field-Intelligence-Access-Breaking-Global-Updates-wit...
https://gtamilchat.info/forum/index.php?topic=4800.new#new Delivers its users with support and answers http://doowontcs.com/bbs/board.php?bo_table=board&wr_id=416318 Offers users with s http://www.suseage.com/forum.php?mod=viewthread&tid=637844&pid=1057034&p... Delivers its users with guidance and responses https://si1225.com/forum.php?mod=viewthread&tid=11136&pid=255595&page=2&... Delivers users with support and responses http://mm520888.com/forum.php?mod=viewthread&tid=118&pid=1476554&page=37... Delivers people with guidance and answers
Delivers people with guidance and answers
ClaudiaGeR (not verified)
onMon, 04/20/2026 - 18:04
Permalink
<a href=https://telegra.ph/Poellauer-Nachrichten-aktuell-So-finden-Sie-seri%C3%B... online</a>
https://telegra.ph/Poellauer-Nachrichten-aktuell-So-finden-Sie-seri%C3%B...
https://invoi.lt/saskaitu-israsymas/ Offers people with help and solutions http://park12.wakwak.com/%7Eesworks/cgi-bin/yybbs.cgi Delivers people with help and answers http://saekdong.org/bbs/board.php?bo_table=hw_01&wr_id=233960 Offers its users wi https://proid.co.kr/bbs/board.php?bo_table=qa&wr_id=683592 Delivers users with https://www.karat-market.ru/forum/?PAGE_NAME=message&FID=1&TID=15&TITLE_... Provides its users with guidance and answers 7b3e34_
<a href=https://telegra.ph/Poellauer-Nachrichten-aktuell-So-finden-Sie-seri%C3%B...
https://telegra.ph/Poellauer-Nachrichten-aktuell-So-finden-Sie-seri%C3%B...
https://cng.toyouwel.com/bbs/board.php?bo_table=free&wr_id=99153 Offers users with s https://nos998.com/forum.php?mod=viewthread&tid=1381&pid=550796&page=257... Offers users with support and responses http://uacarehelper.com/bbs/board.php?bo_table=cnslt&wr_id=112331 Provides its users http://hksolution.co.kr/bbs/board.php?bo_table=comm2&wr_id=206863 Provides its users https://acroxer.com/bbs/board.php?bo_table=Anatomy_Forum&wr_id=260904 Delivers its users
Offers its users with help and solutions
ClaudiaGeR (not verified)
onMon, 04/20/2026 - 18:06
Permalink
<a href=https://telegra.ph/Beyond-Bricks--Mortar-Staying-Ahead-with-Real-Time-Pr... online</a>
https://telegra.ph/Beyond-Bricks--Mortar-Staying-Ahead-with-Real-Time-Pr...
http://jungtest.pagei.gethompy.com/bbs/board.php?bo_table=notice&wr_id=4... Delivers its users https://eslink.co.kr/bbs/board.php?bo_table=Support&wr_id=37631 Delivers users with http://researchjunky.com/question/provides-users-with-support-and-soluti... Provides users with support and solutions http://www2.famille.ne.jp/%7Eayame/system86/cgi-bin/minibbs.cgi Delivers people with support and responses http://121.181.234.77/bbs/board.php?bo_table=blessed_pray&wr_id=1486232 Provides people wit 8e7467b
<a href=https://telegra.ph/Beyond-Bricks--Mortar-Staying-Ahead-with-Real-Time-Pr... online</a>
https://telegra.ph/Beyond-Bricks--Mortar-Staying-Ahead-with-Real-Time-Pr...
http://121.181.234.77/bbs/board.php?bo_table=blessed_pray&wr_id=1486291 Delivers users with http://121.181.234.77/bbs/board.php?bo_table=blessed_pray&wr_id=1486198 Delivers its users http://xn--910bw4q81e.kr/bbs/board.php?bo_table=gallery&wr_id=596 Offers its users wi https://acroxer.com/bbs/board.php?bo_table=Anatomy_Forum&wr_id=260914 Delivers people wit https://main.shuwb.com/bbs/board.php?bo_table=free&wr_id=247559 Delivers people wit
Delivers people with guidance and solutions
ClaudiaGeR (not verified)
onMon, 04/20/2026 - 18:16
Permalink
<a href=https://telegra.ph/Beyond-the-Headlines-Evaluating-Online-Sources--Under... pino</a>
https://telegra.ph/Beyond-the-Headlines-Evaluating-Online-Sources--Under...
http://www.klub.kobiety.net.pl/dziecko/t-keyboard-dla-dziecka-to-dobry-p... Offers its users with support and solutions http://mm520888.com/forum.php?mod=viewthread&tid=118&pid=1476554&page=37... Delivers people with guidance and answers http://av3526.com/forum.php?mod=viewthread&tid=110&pid=388429&page=1084&... Delivers users with help and answers http://jeegel.com/bbs/board.php?bo_table=board&wr_id=555831 Delivers users with https://www.zsohbet.org/forum/index.php/topic,34546.msg183242.html#msg18... Delivers its users with guidance and responses 6701cc6
<a href=https://telegra.ph/Beyond-the-Headlines-Evaluating-Online-Sources--Under...
https://telegra.ph/Beyond-the-Headlines-Evaluating-Online-Sources--Under...
http://www2.famille.ne.jp/%7Eayame/system86/cgi-bin/minibbs.cgi Provides users with support and solutions http://www.suseage.com/forum.php?mod=viewthread&tid=637844&pid=1056986&p... Offers people with help and responses http://signsilla.com/bbs/board.php?bo_table=0401&wr_id=1467476 Provides users with https://www.karat-market.ru/forum/?PAGE_NAME=message&FID=1&TID=15&TITLE_... Provides its users with help and responses https://invoi.lt/saskaitu-israsymas/ Delivers people with help and solutions
Delivers its users with support and answers
ClaudiaGeR (not verified)
onMon, 04/20/2026 - 18:18
Permalink
<a href=https://telegra.ph/Future-Proof-Your-Career-Navigating-the-Latest-News-T...
https://telegra.ph/Future-Proof-Your-Career-Navigating-the-Latest-News-T...
https://phantom.everburninglight.org/archbbs/profile.php?id=26214 Delivers users with help and responses http://dongmi.webmaker21.kr/bbs/board.php?bo_table=qna&wr_id=113612 Offers its users wi https://bci.gilhospital.com/BlueAD/board.php?bbs_id=gc_gallery&mode=view... Delivers users with support and solutions http://dmonster592.dmonster.kr/bbs/board.php?bo_table=qna&wr_id=1370854 Provides its users https://acroxer.com/bbs/board.php?bo_table=Anatomy_Forum&wr_id=260919 Delivers people wit b8e7467
<a href=https://telegra.ph/Future-Proof-Your-Career-Navigating-the-Latest-News-T...
https://telegra.ph/Future-Proof-Your-Career-Navigating-the-Latest-News-T...
http://wbbet88.com/forum.php?mod=viewthread&tid=5212&pid=2976196&page=36... Provides people with guidance and answers https://www.ophot.net/bbs/board.php?bo_table=notice&wr_id=145 Provides users with https://cng.toyouwel.com/bbs/board.php?bo_table=free&wr_id=99137 Delivers people wit https://joinpartyple.com/bbs/board.php?bo_table=free&wr_id=60342 Offers its users wi http://baide24.com/bbs/board.php?bo_table=service&wr_id=418087 Provides users with
Provides people with guidance and responses
ClaudiaGeR (not verified)
onMon, 04/20/2026 - 19:04
Permalink
<a href=https://telegra.ph/Aktuelle-Ereignisse-im-Blick-Verl%C3%A4ssliche-Inform...
https://telegra.ph/Aktuelle-Ereignisse-im-Blick-Verl%C3%A4ssliche-Inform...
https://main.shuwb.com/bbs/board.php?bo_table=free&wr_id=247572 Delivers its users https://joinpartyple.com/bbs/board.php?bo_table=free&wr_id=60354 Delivers users with http://jungtest.pagei.gethompy.com/bbs/board.php?bo_table=notice&wr_id=4... Provides people wit http://saekdong.org/bbs/board.php?bo_table=hw_01&wr_id=233991 Offers its users wi https://www.happyworker.co.kr/bbs/board.php?bo_table=review&wr_id=645032 Provides users with 8e7467b
<a href=https://telegra.ph/Aktuelle-Ereignisse-im-Blick-Verl%C3%A4ssliche-Inform...
https://telegra.ph/Aktuelle-Ereignisse-im-Blick-Verl%C3%A4ssliche-Inform...
http://saekdong.org/bbs/board.php?bo_table=hw_01&wr_id=233969 Delivers users with http://wbbet88.com/forum.php?mod=viewthread&tid=5212&pid=2976247&page=36... Delivers people with guidance and solutions http://av3526.com/forum.php?mod=viewthread&tid=110&pid=388423&page=1083&... Offers its users with help and solutions http://thanksafrica.egreef.kr/bbs/board.php?bo_table=05_01_new&wr_id=964248 Provides its users http://thanksafrica.egreef.kr/bbs/board.php?bo_table=05_01_new&wr_id=964303 Provides its users
Delivers people with help and responses
ClaudiaGeR (not verified)
onMon, 04/20/2026 - 19:06
Permalink
<a href=https://telegra.ph/Sv%C4%9Bt-v-kostce-Zpr%C3%A1vy-Zpravy-a-okam%C5%BEit%... online</a>
https://telegra.ph/Sv%C4%9Bt-v-kostce-Zpr%C3%A1vy-Zpravy-a-okam%C5%BEit%...
https://www.forumum.org/showthread.php?p=217255&posted=1#post217255 Offers users with help and answers http://xn--910bw4q81e.kr/bbs/board.php?bo_table=gallery&wr_id=610 Delivers users with http://121.181.234.77/bbs/board.php?bo_table=blessed_pray&wr_id=1486348 Provides people wit http://www.52she.top/forum.php?mod=viewthread&tid=181471&pid=459771&page... Delivers people with help and solutions https://acroxer.com/bbs/board.php?bo_table=Anatomy_Forum&wr_id=260921 Provides people wit 9876e79
<a href=https://telegra.ph/Sv%C4%9Bt-v-kostce-Zpr%C3%A1vy-Zpravy-a-okam%C5%BEit%... online</a>
https://telegra.ph/Sv%C4%9Bt-v-kostce-Zpr%C3%A1vy-Zpravy-a-okam%C5%BEit%...
http://sydcon.co.kr/bbs/board.php?bo_table=51&wr_id=134267 Provides people wit http://av3526.com/forum.php?mod=viewthread&tid=110&pid=388434&page=1084&... Offers users with support and answers https://www.karat-market.ru/forum/?PAGE_NAME=message&FID=1&TID=15&TITLE_... Offers users with help and answers https://www.happyworker.co.kr/bbs/board.php?bo_table=review&wr_id=645015 Provides its users https://www.karat-market.ru/forum/?PAGE_NAME=message&FID=1&TID=15&TITLE_... Offers people with support and solutions
C
rcarwalwelregro... (not verified)
onMon, 03/28/2022 - 22:09
Permalink
C
iGaming play
HighRollerMage (not verified)
onFri, 12/05/2025 - 01:25
Permalink
https://t.me/s/Monro_officials
C
rcawrlawerlegro... (not verified)
onFri, 04/01/2022 - 03:59
Permalink
C
C
rcawrlawerlegro... (not verified)
onFri, 04/01/2022 - 03:59
Permalink
C
DRAGON MONEY
ChipWhisperer (not verified)
onThu, 12/11/2025 - 04:22
Permalink
https://t.me/dragon_money_mani/41
cialis side effects in women
VeipseZes (not verified)
onWed, 08/07/2024 - 17:25
Permalink
All other adverse effects occurred with similar frequency in the 2 treatment groups, with the exception of thrombotic events; a higher incidence was seen in Tamoxifen Acdima tamoxifen citrate treated patients through 5 years, 1 <a href=https://cialis.lat/discover-the-best-prices-for-cialis>buy cialis online canadian pharmacy</a>
iGaming
DealerShadow (not verified)
onTue, 12/09/2025 - 19:57
Permalink
https://t.me/s/iGaming_live/4871
Мы предлагаем индивидуальные решения для вашего идеального прост
EverettIsomb (not verified)
onTue, 09/03/2024 - 06:52
Permalink
Создайте кухню своей мечты https://fabrikayfabrikaefabrika.ru/!
Скачать моды для андроид
Matthewdek (not verified)
onSat, 11/02/2024 - 22:48
Permalink
Скачать моды для андроид <a href=https://midgame.ru/>Скачать моды для андроид</a>
Скачать моды для андроид
Matthewdek (not verified)
onWed, 11/06/2024 - 09:38
Permalink
Скачать моды для андроид <a href=https://5play-mods.ru/>Скачать моды для андроид</a>
iGaming play
ChipWhisperer (not verified)
onMon, 12/01/2025 - 15:30
Permalink
https://t.me/s/officials_pokerdom/3378
Скачать моды для андроид
MaynardPE (not verified)
onWed, 11/06/2024 - 12:14
Permalink
Скачать моды для андроид <a href=https://5modsru.ru/>Скачать моды для андроид</a>
Rating cas
RouletteRogue (not verified)
onSat, 12/06/2025 - 03:25
Permalink
https://t.me/s/iGaming_live/4868
Скачать моды для андроид
Matthewdek (not verified)
onWed, 11/06/2024 - 18:17
Permalink
Скачать моды для андроид <a href=https://modifikatsii.ru/>Скачать моды для андроид</a>
leon play
HighRollerMage (not verified)
onSat, 11/29/2025 - 13:18
Permalink
https://t.me/s/ef_beef
Скачать моды для андроид
Matthewdek (not verified)
onWed, 11/06/2024 - 19:56
Permalink
Скачать моды для андроид <a href=https://5mod-vzlom.ru/>Скачать моды для андроид</a>
Скачать моды для андроид
Matthewdek (not verified)
onWed, 11/06/2024 - 20:27
Permalink
Скачать моды для андроид <a href=https://5play-mods.ru/>Скачать моды для андроид</a>
Скачать моды для андроид
Matthewdek (not verified)
onWed, 11/06/2024 - 20:58
Permalink
Скачать моды для андроид <a href=https://androeedsd.ru/>Скачать моды для андроид</a>
iGaming play
ChipWhisperer (not verified)
onSun, 11/30/2025 - 13:58
Permalink
https://t.me/s/iGaming_live/4864
iGaming play
LuckyBandit (not verified)
onThu, 12/04/2025 - 13:51
Permalink
https://t.me/s/Sol_officials
Скачать моды для андроид
Matthewdek (not verified)
onWed, 11/06/2024 - 21:30
Permalink
Скачать моды для андроид <a href=https://androeed-top.ru/>Скачать моды для андроид</a>
Скачать моды для андроид
Matthewdek (not verified)
onThu, 11/07/2024 - 02:34
Permalink
Скачать моды для андроид <a href=https://androeedsd.ru/>Скачать моды для андроид</a>
BEEF
PokerPhantom (not verified)
onSun, 12/07/2025 - 20:43
Permalink
https://t.me/s/BEeFCasINo_oFfICIaLs
Скачать моды для андроид
VYGeorge (not verified)
onThu, 11/07/2024 - 03:06
Permalink
Скачать моды для андроид <a href=https://dwapk.ru/>Скачать моды для андроид</a>
BEEF
ChipWhisperer (not verified)
onMon, 12/08/2025 - 01:22
Permalink
https://t.me/s/BEeFcasInO_OffICiALS
Скачать моды для андроид
MaynardPE (not verified)
onThu, 11/07/2024 - 03:40
Permalink
Скачать моды для андроид <a href=https://5modsru.ru/>Скачать моды для андроид</a>
Скачать моды для андроид
Matthewdek (not verified)
onThu, 11/07/2024 - 04:13
Permalink
Скачать моды для андроид <a href=https://5mod-vzlom.ru/>Скачать моды для андроид</a>
DRAGON MONEY
AceSorcerer (not verified)
onThu, 12/11/2025 - 00:04
Permalink
https://t.me/dragon_money_mani/18
Скачать моды для андроид
Matthewdek (not verified)
onThu, 11/07/2024 - 04:44
Permalink
Скачать моды для андроид <a href=https://5play-mods.ru/>Скачать моды для андроид</a>
iGaming play
DealerShadow (not verified)
onMon, 12/01/2025 - 16:16
Permalink
https://t.me/officials_pokerdom/3167
Скачать моды для андроид
Matthewdek (not verified)
onThu, 11/07/2024 - 05:18
Permalink
Скачать моды для андроид <a href=https://androeedsd.ru/>Скачать моды для андроид</a>
iGaming play
LuckyBandit (not verified)
onThu, 12/04/2025 - 16:36
Permalink
https://t.me/s/Starda_officials
Скачать моды для андроид
Matthewdek (not verified)
onThu, 11/07/2024 - 05:50
Permalink
Скачать моды для андроид <a href=https://androeed-top.ru/>Скачать моды для андроид</a>
Скачать моды для андроид
Matthewdek (not verified)
onThu, 11/07/2024 - 06:32
Permalink
Скачать моды для андроид <a href=https://androeedsd.ru/>Скачать моды для андроид</a>
iGaming play
PokerPhantom (not verified)
onFri, 12/05/2025 - 03:11
Permalink
https://t.me/s/IZZI_officials
Скачать моды для андроид
VYGeorge (not verified)
onThu, 11/07/2024 - 07:25
Permalink
Скачать моды для андроид <a href=https://dwapk.ru/>Скачать моды для андроид</a>
dapoxetine and viagra
OpporoJar (not verified)
onFri, 11/08/2024 - 01:55
Permalink
I rolled through the first sets like a division of German Panzers invading France <a href=https://fastpriligy.top/>priligy dapoxetina 30mg nos eua</a>
Скачать моды для андроид
Matthewdek (not verified)
onFri, 11/08/2024 - 02:49
Permalink
Скачать моды для андроид [url=https://mody-android.ru/]Скачать моды для андроид[/url]
Pages
Add your comment